Free AI Image Generator. No Sign-Up Required. Full Access.
AI Floral Paper Designer
Generate custom floral stationery with AI, featuring watercolor and ink effects, perfect for journaling and scrapbooking.
Welcome to the AIFreeBox free AI Floral Paper Designer online tool!
This tool allows you to effortlessly create stunning and personalized floral stationery with just a few simple descriptions. Whether you’re looking to design beautiful writing paper for your personal journal, craft unique scrapbooking pages, or make customized stationery for gifts, AI Floral Paper Designer helps bring your floral ideas to life with ease.
In this guide, you’ll find everything you need to know about using the tool effectively, including key features, tips for achieving the best results, and troubleshooting advice. Whether you’re designing for a creative project, journaling, or simply enjoying the process of creating beautiful floral patterns, this guide will help you unlock your creativity and generate gorgeous floral designs.
What is the AI Floral Paper Designer?
The AI Floral Paper Designer is a creative tool that allows you to design beautiful, custom floral stationery using artificial intelligence. With this tool, you can generate unique paper designs that are perfect for journaling, scrapbooking, and other creative projects. By simply inputting your preferred flower types and colors, the tool creates intricate floral patterns with an artistic touch, featuring watercolor and ink wash effects.
Whether you’re looking to create vintage-style writing paper, personalized stationery, or artistic backgrounds, AI Floral Paper Designer provides an easy and quick way to bring your ideas to life. You don’t need any special design skills—just choose your flowers and colors, and the AI does the rest! This tool is ideal for anyone who loves adding a personal touch to their creative projects or looking for a quick, beautiful design for any occasion.
What Can AI Floral Paper Designer Generate?
- Floral Stationery: Create custom floral designs for writing paper, perfect for personal letters or notes.
- Vintage Writing Papers: Design old-fashioned, vintage-inspired paper with delicate floral patterns, ideal for journals or scrapbooks.
- Scrapbooking Pages: Add beautiful floral elements to your scrapbooking projects, making each page unique and artistic.
- DIY Stationery: Customize stationery for gifts, invitations, or just to add a personal touch to your day-to-day writing.
How to Use AI Floral Paper Designer: Step-by-Step Guide

Follow these easy steps to create beautiful floral stationery with the AI Floral Paper Designer:
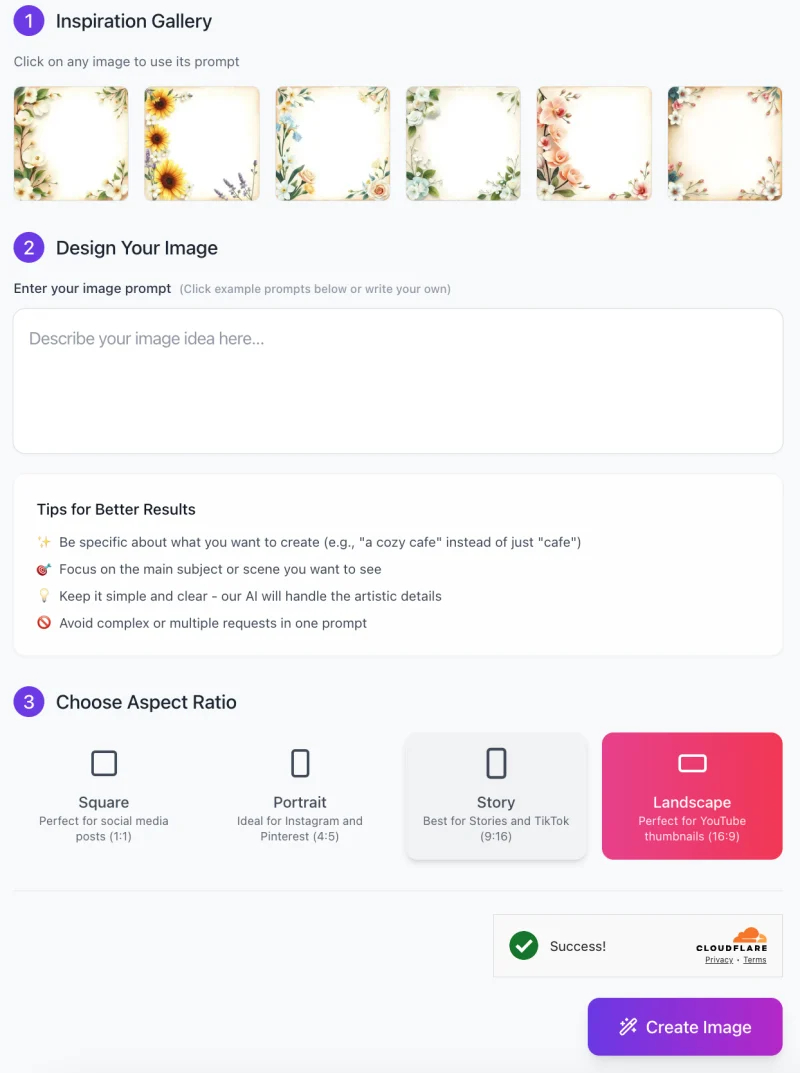
Step 1: Inspiration Gallery
- Explore the Inspiration Gallery: Start by browsing through the example images in the gallery.
- These images show various floral designs that you can use as a starting point.
- Click on any image that you like to automatically use its prompt for your design.
- Preview Designs: These designs are perfect for getting inspiration and seeing different floral styles, which can help you decide the direction of your own project.
Step 2: Design Your Image
Enter Your Image Prompt: In the text box labeled “Describe your image idea here,” you can write your custom description. This is where you input your own idea for a floral design. For example, you might write: “Lavender and roses with a soft pink and lavender color palette.”
Tips for Better Results:
- Be specific with your description to get more accurate results (e.g., “a vintage lavender background” instead of just “lavender”).
- Focus on one main scene or idea for the design.
- Keep the description simple and clear—our AI will handle the artistic details.
Step 3: Choose Aspect Ratio

Select the Aspect Ratio:
- Square: Ideal for social media posts (1:1 ratio).
- Portrait: Perfect for Instagram and Pinterest (4:5 ratio).
- Story: Best for Stories and TikTok (9:16 ratio).
- Landscape: Great for YouTube thumbnails (16:9 ratio).
Choose the aspect ratio that best fits your project needs by selecting the corresponding button.
Step 4: Generate Your Image
- Click “Create Image”: Once you’ve entered your description and selected the aspect ratio, hit the “Create Image” button.
- The AI will process your request and generate your custom floral stationery design.
Step 5: Download Your Design
- Success Notification: After the image is generated, you will see a confirmation that the design was successfully created.
- Download Your Image: Save your newly created floral paper design by downloading it to your device.
- You can now use it for journaling, scrapbooking, or any other creative project!
By following these simple steps, you can easily create beautiful floral stationery that fits your unique style and needs.
Tips for Best Results
1. Best Practices for Flower and Color Combinations
- Choose flowers that complement each other. For example, pair soft lavender with white roses or bright sunflowers with soft green leaves.
- Keep the colors balanced—don’t use too many bold colors. Light pastels or gentle tones like pale pinks, blues, and greens work best for creating a peaceful and elegant design.
2. How to Frame Your Designs to Leave Space for Writing
- Place flowers along the edges or corners of the design to create a border while leaving the middle area open for writing.
- Avoid placing too many flowers in the center. This ensures there’s enough space for your notes or journal entries without distractions.
3. Adjusting Image Opacity for Softer or Bolder Designs
- If you want a softer look, reduce the opacity of the floral elements so they blend gently into the background.
- For a bolder design, keep the opacity higher so the flowers stand out more clearly and create a strong visual effect.
4. How to Use Different Styles (e.g., Watercolor vs. Ink Wash)
- Watercolor: Choose this style for a light, flowing, and soft effect. The colors blend together gently, creating a calm and dreamy look.
- Ink Wash: Opt for this style if you want a more artistic, sketchy look with darker outlines and more dramatic contrasts. The ink wash effect gives the flowers a hand-drawn feel.
By following these tips, you can create designs that are not only beautiful but also practical for writing or other creative uses.
Common Issues and Troubleshooting
1.How to Fix Overly Busy Floral Designs (When There’s Not Enough White Space)
- If the design feels too crowded with flowers, try placing them only along the edges or corners, leaving the middle area open for writing or other content.
- Simplify your flower choices. Fewer types of flowers in the design can help create a more balanced and spacious look.
- Reduce the size of the flowers or use smaller floral elements to avoid overwhelming the design.
2. Fixing Color Balance Issues (When Colors Appear Too Bold or Too Muted)
- If the colors are too bold, try adjusting the opacity of the flowers to make them lighter and softer.
- If the colors look too muted, increase the brightness or saturation of your chosen colors to make the flowers stand out more.
- Consider using complementary colors or limiting your color palette to create a more harmonious and balanced design.
3. Addressing Export Issues (If Images Aren’t Saving Correctly)
- Make sure your internet connection is stable during the export process to avoid interruptions.
- If the image isn’t saving, try downloading it again or using a different browser.
These simple fixes will help you troubleshoot and make sure your designs come out just as you envision them!
Ideal Use Cases
- Writing & Journaling: Use the tool to create custom floral paper for your personal journals or letters. Whether you’re writing notes to friends or keeping a diary, the unique designs make your writing space feel special and creative.
- Scrapbooking: Add beautiful, floral-themed backgrounds to your scrapbooking pages. With custom designs, your scrapbook can become a work of art, filled with personal memories and creative layouts.
- DIY Stationery: Create unique stationery for yourself or as gifts. Personalized floral designs make your letters, invitations, or thank-you notes stand out and feel extra special.
- Artistic Projects: For artists or hobbyists, the tool helps you create floral designs that add an artistic touch to any project. Whether you’re creating greeting cards, wall art, or other crafts, the possibilities are endless with beautiful floral patterns.
FAQs
How do I create a custom floral design?
To create a custom design, simply describe the flowers you want and their colors in the “Describe your image idea here” box. You can choose from a variety of flowers and color combinations, and the AI will generate your personalized floral stationery.
Can I use my designs for commercial purposes?
Yes! Once you’ve created your floral design, you can use it for personal or commercial projects, such as stationery for sale, scrapbooking, or crafting.
What if I don’t like the design?
No worries! If you’re not happy with the design, you can try a different prompt or adjust the flowers and colors to fit your vision better. The AI gives you flexibility to tweak your design until it’s just right.
Can I upload my own flowers or images to use?
Currently, the tool only allows you to choose from the preset flowers and colors. However, you can be creative with the combinations to get the results you want!
What file formats are available for download?
You can download your designs in common WEBP format, which is perfect for printing or using digitally.
How do I change the aspect ratio of my design?
When you’re ready to generate your image, simply choose the aspect ratio (Square, Portrait, Story, or Landscape) depending on the intended use. This helps you get the right dimensions for your project.


