Free AI Image Generator. No Sign-Up Required. Full Access.
AI Woodcut Engraved Illustrations Generator
Create stunning woodcut-style illustrations with AI, using traditional engraving techniques for vintage art.
Explore other AI tools that work well with this one
Discover other tools with functions and purposes similar to the one you are currently viewing.
- AI Art Generator

- AI FolkArt Illustrations Generator

- AI Wood Carving Ideas Generator

- AI Animal Illustrations Generator

- AI Deco Art Generator

- AI African Folk Art Generator

- AI Art Nouveau Generator

- AI Adorable Animal Illustrations Generator

- AI Fantasy Watercolor Generator

- AI Inky Whimsy Illustration Generator

- AI Pictura Generator

- AI Watercolor Birds Generator

Discover the tools most favored and highly-rated by users on our website.
Explore more AI tools in these related categories
AI tools that generate images using various artistic styles and visual effects.
AI tools that generate digital illustrations and visual artwork automatically.
AI tools for generating visual patterns and textures in digital content.
Welcome to the AIFreeBox free AI Woodcut Engraved Illustrations Generator online tool!
This tool allows you to effortlessly create unique and detailed woodcut-style artwork using the power of AI. Whether you’re an artist, a designer, or someone looking to add a handcrafted touch to your projects, this tool helps you bring your creative ideas to life with just a few simple descriptions.
In this guide, you’ll find everything you need to know about how to use the tool effectively, including key features, tips for getting the best results, and troubleshooting advice. Whether you’re designing a vintage-style poster, creating a book cover, or simply exploring the world of traditional art techniques, this guide will help you unleash your creativity and generate stunning, unique illustrations in no time.
What is AI Woodcut Engraved Illustrations Generator?
The AI Woodcut Engraved Illustrations Generator is a creative tool that allows you to generate stunning vintage-style artwork using artificial intelligence. By combining traditional techniques like woodcut, gravure, and lino cut, this tool helps you create intricate, handcrafted illustrations without needing advanced skills or equipment. Whether you’re an artist, designer, or just looking for a unique touch for your project, this tool provides an easy way to produce detailed, eye-catching images.
What Can You Generate?
The AI Woodcut Engraved Illustrations Generator allows you to create detailed and unique images that look like traditional artwork. Here’s what you can generate with it:
Types of Images
Vintage-style illustrations with a handmade, carved look.
High-contrast images with fine line details and textured surfaces.
Artwork that gives off a rustic, artistic feel, similar to old printed works.
Examples of Subjects
Animals: Foxes, lions, owls, deer, and more.
Landscapes: Mountains, forests, deserts, and rivers.
Nature: Trees, plants, flowers, and other elements from the natural world.
Vintage Scenes: Traditional cityscapes, historical scenes, or retro-themed illustrations.
Traditional Techniques
Woodcut: This technique involves carving an image into wood, which is then used to print the design onto paper. It creates bold, rough lines and a textured look.
Gravure: A technique that uses etched or engraved plates to create fine, detailed images. It’s known for smooth lines and deep contrasts.
Lino Cut: Similar to woodcut, this technique uses a linoleum block to carve out designs. It creates sharp, clean lines and can show fine details with minimal color.
These techniques are combined by AI to generate digital artwork that feels handcrafted and unique.
How to Use the Tool: Step-by-Step Guide

Follow these easy steps to create your own AI-generated woodcut-style illustration:
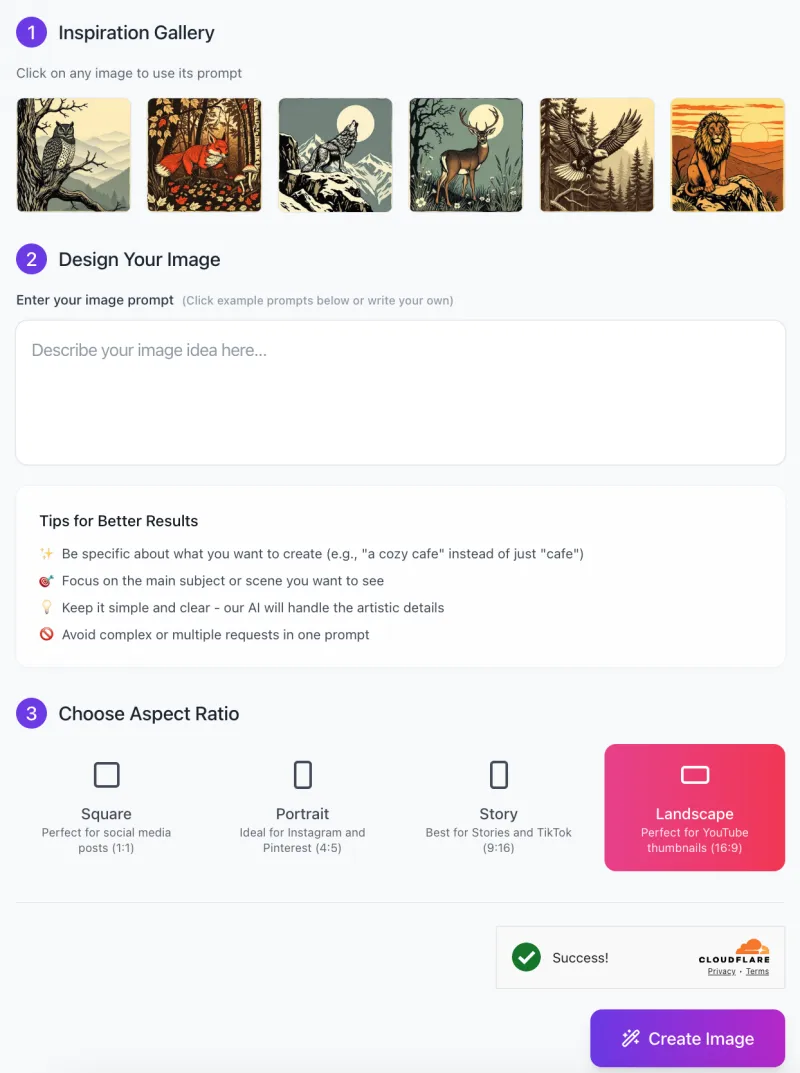
Step 1: Inspiration Gallery
- Browse the Inspiration Gallery: At the top of the screen, you’ll find several example images.
- Click on any image that inspires you to automatically use that prompt as a starting point.
Tip: These example prompts can give you a better idea of what kind of image you can create. - You can also choose to write your own custom prompt if you have a specific idea in mind.
Step 2: Design Your Image
Enter Your Image Prompt: In the box labeled “Describe your image idea here…”, write a description of the image you want to generate.
Example: “A fox walking through an autumn forest with tall trees and fallen leaves.”
Tips for Better Results
- Be specific about what you want to create. For example, instead of just saying “a forest,” you could say “a dark, misty forest at dawn with towering trees.”
- Focus on the main subject or scene you want to see. Describe the key elements you want to appear in the image.
- Keep your description clear and simple; the AI will handle the details.
- Avoid adding multiple requests or overly complex instructions in a single prompt.
Step 3: Choose Aspect Ratio
Select the Aspect Ratio: Choose the shape of your image depending on how you plan to use it:
- Square (1:1): Perfect for social media posts.
- Portrait (4:5): Ideal for Instagram or Pinterest posts.
- Story (9:16): Best for Stories on platforms like Instagram or TikTok.
- Landscape (16:9): Great for YouTube thumbnails or widescreen displays.
Tip: Select the aspect ratio based on where you want to display your image for the best fit.
Step 4: Create Your Image
- Click “Create Image”: Once you’re happy with your prompt and aspect ratio, click the Create Image button at the bottom to generate your illustration.
- If you’re not happy with the first result, you can adjust the prompt or try different descriptions until you get the image you want.
- The tool is designed to handle artistic details, so you don’t need to worry about specifying things like shading or texture—just focus on the main idea.
Now you’re ready to create beautiful, unique illustrations in the style of traditional woodcut art!
Tips & Tricks for Better Results
Here are some simple tips to help you get the best results when using the AI Woodcut Engraved Illustrations Generator:
1. How to Write Clear and Specific Prompts
Be as specific as possible with what you want. Instead of saying “a cat,” try “a black cat sitting on a windowsill with a warm sunbeam shining through.”
Focus on the main subject. If you want a lion in the jungle, mention the lion’s position and the type of jungle (e.g., dense, tropical).
The more details you provide, the better the result!
2. Using Detailed Descriptions to Get More Accurate Results
Describing the scene in detail can make a big difference. Instead of just “a forest,” say “a dense forest with tall oak trees and mist hovering over the ground.”
Add extra details like time of day (morning, evening, sunset), weather (sunny, foggy, rainy), or specific textures (rough bark, smooth leaves).
3. Experimenting with Different Subjects, Backgrounds, and Color Palettes
Don’t be afraid to try different combinations. Change the subject (e.g., from a fox to a deer), or alter the background (e.g., from a forest to a desert).
You can also experiment with color palettes—try earthy tones like browns and greens for nature scenes or warmer colors like oranges and reds for dramatic landscapes.
4. Best Practices for Scaling and Enhancing Generated Images
Once you have your image, you can use it for various purposes. If you need to make it larger or smaller, be mindful of image quality.
For posters, t-shirts, or print designs, ensure the image is in the right aspect ratio and high resolution. You may want to enhance it further using image editing software if needed.
Always check the final output to ensure it fits your project needs, whether for digital or physical use.
By following these tips, you’ll be able to create even better, more personalized woodcut-style illustrations every time!
Common Issues and How to Solve Them
Here are some common problems users might face while using the AI Woodcut Engraved Illustrations Generator, along with simple solutions to fix them:
Problem 1: Low-Quality or Unclear Results
Solution:
Refine your prompt with more specific details. The clearer you describe the subject and background, the better the result.
For example, if the image of a forest is too vague, try adding details like “dense trees with sunlight peeking through” or “misty morning with fallen leaves.”
More details will help the AI understand what you want.
Problem 2: Limited Customization Options in Output
Solution:
If the generated image doesn’t meet your needs, adjust the color palette, background, or subject description.
Try changing the background details or focusing on specific features of the subject (e.g., “a lion under a sunset sky” or “fox in a snowy landscape”).
Small adjustments can give you a more customized look.
Problem 3: Difficulty Generating Complex Images
Solution:
If the image is too complicated for the AI to generate, break the description into simpler parts.
Instead of asking for a “jungle with a lion, waterfall, and birds,” try describing the lion in one prompt and the jungle in another.
This approach will give you better results and let you combine them later.
Problem 4: Image Style Not Matching Expectations
Solution:
If the image style doesn’t match what you wanted, be more specific about the artistic style you want (e.g., “rough textures,” “high contrast,” or “vintage woodcut style”).
Adding these details will help the AI focus on achieving the style you’re aiming for.
By understanding and addressing these common issues, you can easily improve the quality and relevance of the images generated by the tool.
Best Use Cases
Here’s how different people can make the most of the AI Woodcut Engraved Illustrations Generator:
Creative Professionals
Illustrators: Add a unique, vintage touch to your illustrations with traditional art styles.
Graphic Designers: Use the tool to create distinctive designs that stand out in marketing or branding.
Artists: Explore new creative possibilities and experiment with woodcut-style art without needing to carve by hand.
Personal Projects
Prints and Posters: Create one-of-a-kind artwork to hang on your wall or give as gifts.
Digital Artwork: Design digital pieces with a traditional look, perfect for personal websites, social media, or online portfolios.
Commercial Use
Merchandise Designs: Create unique designs for t-shirts, mugs, posters, or other products.
Book Covers: Design vintage-style covers for books, especially for genres like history, fantasy, or nature.
Marketing Materials: Stand out with artistic flyers, brochures, or banners that have a handcrafted, rustic feel.
Education and Learning
Understanding Traditional Art Techniques: Learn about traditional engraving and woodcut methods by seeing how they are recreated through AI.
Art Classes: Use the tool in classrooms to demonstrate how classic art styles can be applied in modern design and digital tools.
This tool is useful for anyone looking to bring a touch of traditional craftsmanship into their work, whether for personal use or professional projects.
FAQs
How do I export the images I create?
After generating your image, you’ll usually have the option to download it directly. The image is typically available in a high-quality format that you can use for print, digital projects, or social media.
Can I use the generated images for commercial purposes?
Yes! You can use the images for commercial purposes, like designing products, marketing materials, or even book covers.
How do I improve the quality of my images?
If you’re not satisfied with the quality, try refining your prompt with more details, like adding specific descriptions of textures or lighting. You can also adjust the aspect ratio or size settings to better fit your project.
Can I adjust the generated image after it’s created?
While the tool automatically creates the image based on your prompt, you can always use external image-editing software to make tweaks. For example, you can resize the image, adjust colors, or add extra elements to make it fit your needs.
How can I make my prompts more effective?
To get the best results, focus on describing the main subject and key details, such as the setting, colors, and mood. The more specific and clear your description, the better the AI can create the image you want.
What if the generated image doesn’t match my expectations?
If the image doesn’t turn out as expected, try adjusting the details of your prompt. You might want to be more specific about the artistic style (e.g., “high-contrast woodcut”) or refine the description of the subject and background.


